Why Timely Shingle Repair Matters
Learning how to repair roof shingles is a smart way to keep Houston-area homes dry and energy-efficient. Your roof is the first line of defense, so taking a few minutes to master simple fixes on our home roofing solutions (https://siennaroofing.com/) page can spare you from costly leaks later.
Quick Answer: How to Repair Roof Shingles
- Curled shingles – Lift, add sealant underneath, weigh down 24 h
- Cracked shingles – Seal below and above the crack, press granules into wet cement
- Missing shingles – Remove nails, slide in new shingle, re-nail and seal
- Work on warm, dry days – Shingles flex better and footing is safer
A cracked tab today can become rotten decking tomorrow. The following guide—field-tested by our founder, Andre Castro—shows exactly what to look for and how to act fast.

Before You Climb: Safety, Tools, and Damage Assessment
Before tackling a how to repair roof shingles project, proper preparation is essential. It’s not just about fixing the problem; it’s about doing it safely and effectively. We’ll cover safety, tools, and damage assessment to set you up for success. For a deeper dive, see our guide to damaged roof shingles (https://siennaroofing.com/dont-get-shingled-out-your-guide-to-damaged-roof-shingles/).

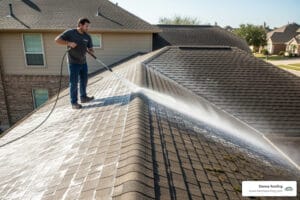
Safety First: Preparing for a Safe Roof Repair
Safety is non-negotiable when working on a roof. A preventable accident can have serious consequences. Follow these essential safety guidelines:
- Sturdy Footwear: Wear non-slip, rubber-soled shoes like work boots for maximum grip.
- Ladder Safety: Place your ladder on level ground, extending it at least three feet above the roof edge. Always have a spotter to hold it steady.
- Protective Gear: Use heavy-duty gloves to protect from sharp shingle edges, safety glasses to block debris, and consider a safety harness for steep or high roofs.
- Weather Timing: Work on warm, dry afternoons. Shingles are more flexible when warm, reducing the risk of cracking. Never work on a wet, icy, or dewy roof.
- Know Your Limits: If you feel unsafe at any point, stop and call a professional. Your safety is the top priority.
Gather Your Toolkit: Essential Materials for Shingle Repair
Having the right tools makes the job go smoothly. Here are the essentials you’ll need:
- Replacement Shingles: Find the closest possible match in color and style. Leftover shingles from the original installation are ideal.
- Flat Pry Bar: For gently lifting shingles and prying out nails without causing damage.
- Hammer & Roofing Nails: Use 1 1/4-inch roofing nails, which have wide heads for a secure grip.
- Utility Knife: A sharp knife with extra blades is crucial for cutting shingles to size.
- Roofing Sealant: Use asphalt plastic roof cement in a caulking gun to create a durable, waterproof bond.
- Putty Knife: To spread sealant smoothly over cracks.
- Bricks or a Heavy Object: To weigh down curled shingles while the sealant cures.
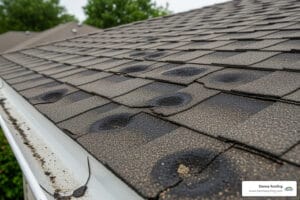
Spotting the Problem: How to Identify Repairable Damage
Catching problems early is the key to preventing major damage. Inspect your roof twice a year and after storms for these common issues:
- Curling or Lifting Corners: Shingle edges curl up or down, breaking the seal and catching wind.
- Cracked or Torn Shingles: Caused by impacts or temperature swings, these create a direct path for water.
- Missing Shingles: Obvious gaps that leave the roof deck exposed, common after high winds.
- Blistering or Bubbling: Indicates trapped moisture or poor attic ventilation.
- Excessive Granule Loss: Look for large amounts of sand-like material in your gutters, which means the shingle’s protective layer is wearing away.
- Interior Water Stains: A serious sign that water has already breached your roof’s defenses and requires immediate attention.
Your Step-by-Step Guide on How to Repair Roof Shingles
Now it’s time to get to work. Each type of shingle damage requires a specific technique. Follow these steps carefully for a lasting repair that will protect your home.

How to Fix a Curled Roof Shingle
This is one of the easiest DIY roof repairs and can add years to your shingle’s life.
- Soften the Shingle: On a warm day, the sun will make the shingle pliable. If it’s cool, you can carefully use a hair dryer on a low setting. Never force a cold, brittle shingle.
- Apply Sealant: Gently lift the curled corner and apply a generous bead of asphalt roof cement underneath with a caulking gun.
- Press and Weigh Down: Press the shingle down firmly and place a brick on top to ensure a strong, even bond.
- Cure for 24 Hours: Leave the weight in place for a full day to allow the sealant to cure completely.

How to repair roof shingles that are cracked or torn
A cracked shingle is an open invitation for water. This repair creates a durable, waterproof patch.
- Clean the Area: Remove any loose debris from around the crack for a clean bonding surface.
- Seal Underneath: Carefully lift the shingle and apply roofing cement under the entire length of the crack.
- Press and Seal on Top: Press the shingle down, then apply a second bead of sealant directly over the crack.
- Spread and Camouflage: Smooth the top sealant with a putty knife. While it’s wet, sprinkle matching granules (found in gutters or from a spare shingle) over the sealant and press them in gently. This protects the sealant from UV rays and hides the repair.

How to repair roof shingles that are missing or blown-off
This repair is critical as a missing shingle leaves your roof deck exposed. It requires patience but is very manageable.
- Break Sealant Bonds: Use a flat pry bar to gently break the seals of the shingles directly above and around the missing one. Work slowly to avoid causing more damage.
- Remove Old Nails: Carefully lift the shingle directly above the gap to expose the nails holding the old shingle. Use the pry bar to remove all nails (there may be up to eight).
- Remove Old Shingle: Once all nails are out, the damaged shingle remnants should slide out easily.
- Position New Shingle: Slide the new shingle into place, ensuring it aligns with the surrounding shingles and correctly overlaps the course below.
- Secure with New Nails: Lift the overlapping shingle and drive four 1 1/4-inch roofing nails into the new shingle, just above its cutout slots.
- Seal All Tabs: Apply dabs of roofing cement under the tabs of the new shingle and any other shingles you loosened. Press them down firmly to create a waterproof, wind-resistant seal.

DIY vs. The Pros: When to Call for Professional Roof Repair
Knowing how to repair roof shingles is a great DIY skill, but it’s crucial to recognize when a job is best left to professionals. Your safety and the complexity of the damage are the key factors in making the right call.
When is DIY a Good Option?
- Fixing a few curled or cracked shingles.
- Replacing a single missing shingle on a low-slope roof.
- When you are comfortable working on a ladder and have the proper safety gear.
When Should You Call a Professional?
- There is widespread damage across large sections of the roof.
- Your roof has a steep pitch that is unsafe to walk on.
- You find signs of rot or damage to the underlying roof deck.
- You see major water stains on your interior ceilings, indicating a significant leak.
According to Forbes, professional repairs can range from $150 to $8,000 (https://www.forbes.com/home-improvement/home-emergencies/roof-shingles-blown-off/), reflecting the wide scope of potential issues. For complex problems, a professional roof repair (https://siennaroofing.com/roof-repair/) is the safest and most effective solution.
For homeowners in Sugar Land and the greater Houston area, Sienna Roofing provides expert assessments and guaranteed repairs. Don’t hesitate to call for backup; sometimes, it’s the smartest decision you can make to protect your home.
Quick Safety Refresher
Already checked the full checklist above? Keep these core rules top-of-mind before you step onto a ladder:
- Wear sturdy, non-slip shoes and heavy-duty gloves.
- Place the ladder on level ground, have a spotter, and extend it three feet past the eave.
- Work only on warm, dry afternoons; wet or icy shingles are trip hazards.
- Use eye protection and, for anything higher than a single-story, clip into a safety harness.
- If the roof pitch feels unsafe, call a friend or a pro.
Need a trusted local crew? Our Sugar Land neighbors can always reach us through our Roofer Near Me: Sugar Land (https://siennaroofing.com/roofer-near-me/sugar-land/) page.
At-a-Glance Repair Cheat Sheet
The detailed walk-through in Section 2 covers each fix step-by-step. Print or bookmark this mini reminder so you don’t have to scroll while you’re on the roof:
- Curling shingle → warm, cement, brick, cure 24 h
- Crack → cement under & over, smooth, sprinkle granules
- Missing tab → loosen surrounding shingles, extract nails, slide in match, nail & seal
That’s it—simple, safe, effective.
DIY or Dial a Pro? (Fast Verdict)
Small, isolated repairs = DIY green light.
Anything involving widespread damage, a steep pitch, or interior leaks = call the experts.
Professional fixes can range from $150 to $8,000 according to Forbes (https://www.forbes.com/home-improvement/home-emergencies/roof-shingles-blown-off/). When safety or structural integrity is on the line, it’s smarter and cheaper in the long run to let our certified crew handle it.